• STYLE
    • Style
    • LET’S SHOP>
      • Shop Instagram
      • Follow Me at Like to Know It!
      • Amazon Shop
  • HOME >
    • Seasonal Home Tours
    • Home Decor
    • Porch Life
  • ENTERTAIN >
    • Holidays & Parties
    • Hosting Tips
    • Happy Hour
    • Taco Tuesday
  • TRAVEL
    • I ❤️ ATLANTA
    • Girls Weekend
  • Lake House Build
  • About >
    • Meet Heather
    • SUBSCRIBE
    • Press
    • Contact
    • Front Porch Coffee Talk
    • Privacy Policy & Disclaimers
  • RESOURCE LIBRARY

Southern State of Mind Blog by Heather

LEGO Nook || How We Made Our Own LEGO Minifigure Display Frame

in BOY MOM, HOME on 09/22/20

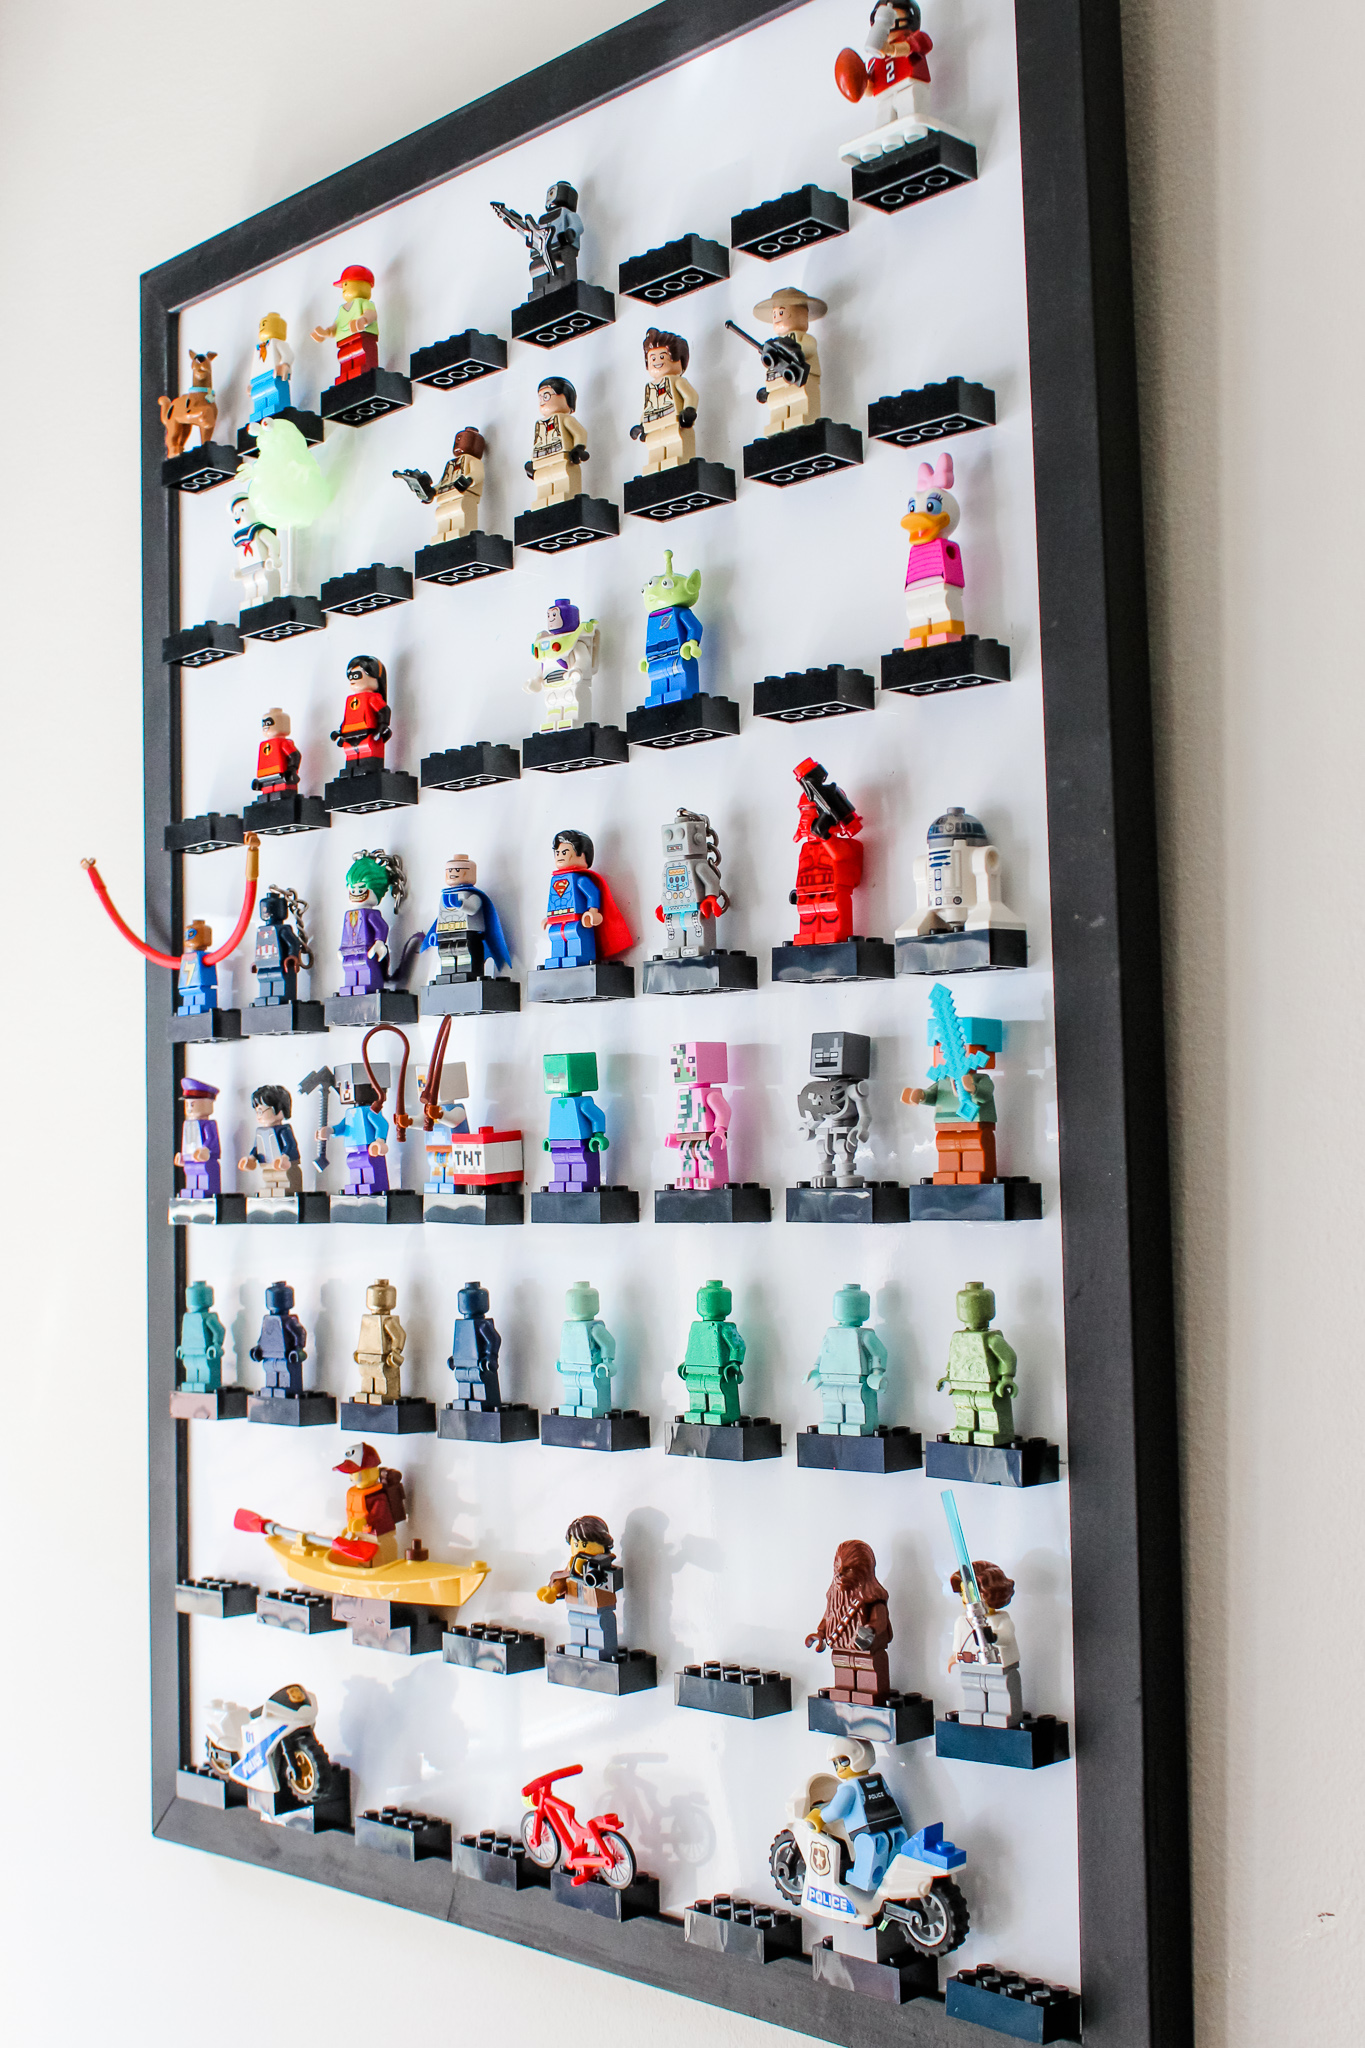
Well, it’s the final stretch of the $100 Room Challenge and I am loving the way this little Lego Building Nook is coming together.  Admittedly I think I am enjoying creating this LEGO Building Nook for the boys just as much as they enjoy building with their LEGO! It’s a win-win… and the best part is that we are gaining a completely new functional space in our home for around a hundred bucks. The full reveal is coming next week but today I am sharing a small DIY detail that I absolutely adore- this LEGO Minifigure Display Frame.

LEGO Minifigure Display Frame

LEGO Minifigure Display Frame DIY

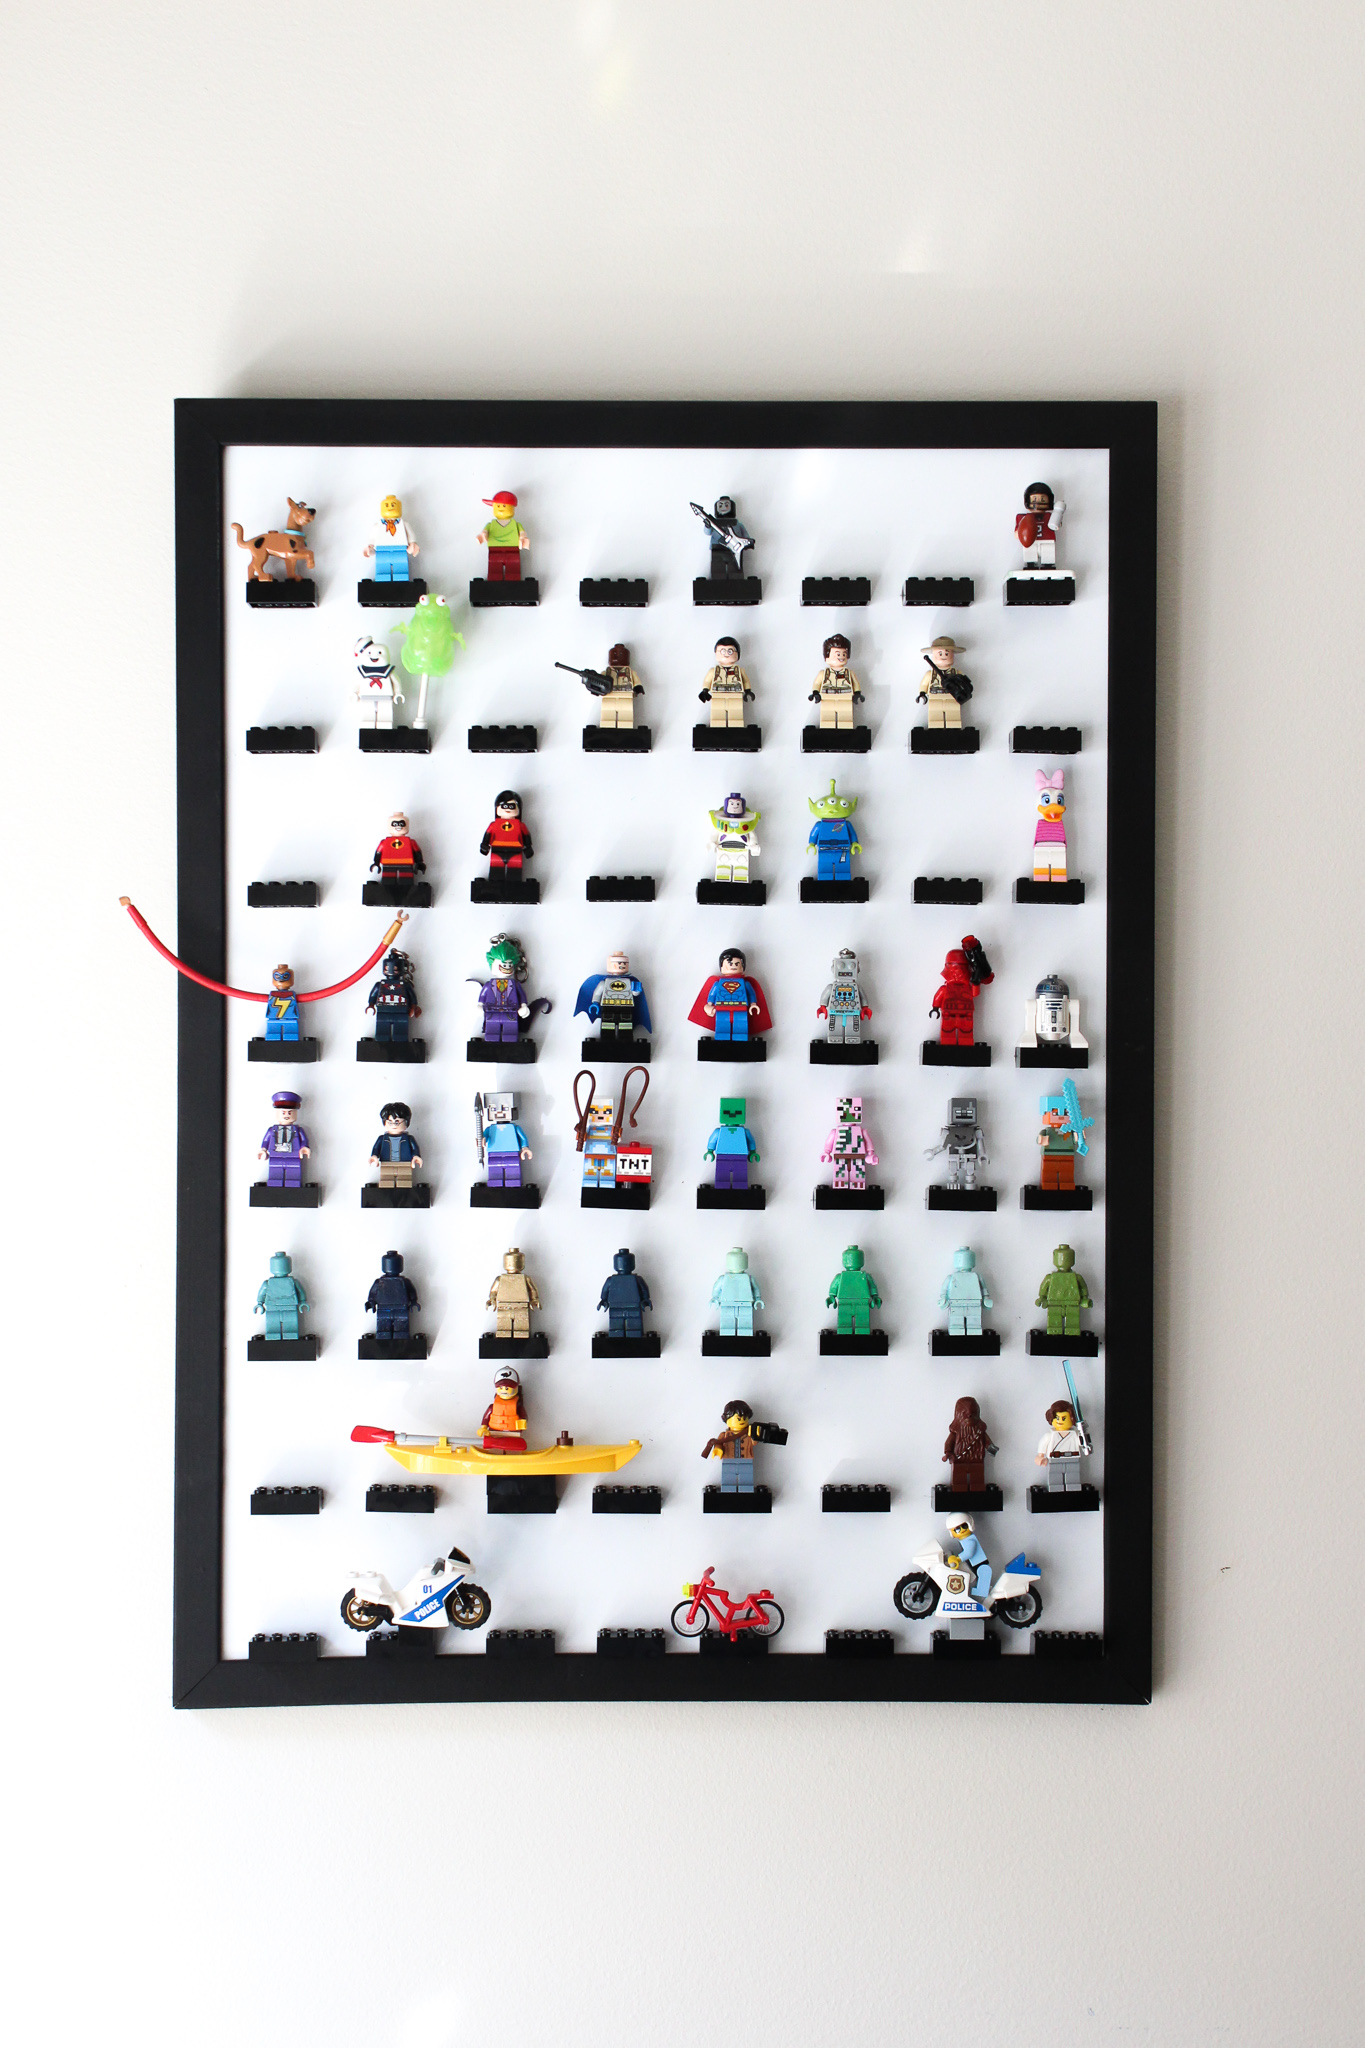
The more we have gotten into LEGO around here, the more I have to come to appreciate the darling little LEGO Minifigure characters. So I knew that our LEGO Building Nook just wouldn’t be complete without a fun way to display them. I wasn’t sure exactly how I was going to pull this together (especially on my small budget!) but when I came across this whiteboard for $5 at our thrift store –  the vision came together!  This display ended up costing us around $22 and it really is the perfect finishing touch in this room. 

DIY LEGO Minifigure Display Frame


LEGO Minifigure Display Frame

SUPPLIES NEEDED || DIY LEGO Minifigure Display 

  • 17 x 23 White Board   – Similar to this one on Amazon 
  • 64 2×4 Black LEGO Bricks – We found our bricks at LEGOLAND  Atlanta for around $17- but Amazon has them available HERE
  • Gorilla Glue
  • Your fave LEGO Minifigures!

How We Made A LEGO Minifigure Display Frame

HOW TO MAKE || LEGO Minifigure Display 

  1. First you will want to measure your whiteboard to determine how many Minifigures you can fit on your display. We wanted to allow around two inches between each row and I just sketched out how I thought it would lay out best on a piece of scratch paper. Based on my measurements, we decided we would do 8 across and 8 down allowing us to display 64 characters. I got the boys involved with this part and they were excited to see it all come together. 
  2. Once you have your general layout determined- get out the tape measure and ruler and it’s time to get to work! Because this is a white board, I used a dry erase marker to make my marks noting where the LEGO bricks would go. Then I was just able to erase the lines once everything was glued.
  3. To glue on the bricks, I used Gorilla Glue and a toothpick to spread it out evenly on the brick. To ensure that my bricks were straight, once I glued the bricks on I used the ruler to nudge them all while the glue was still wet to make a perfectly straight line on each row. 
  4. Allow the bricks to fully set before placing your LEGO Minifigs on. This was the hardest part! 🙂
  5. Once the bricks are fully secured- it’s time to have some fun with your display!

LEGO Minifigure Display Frame

The boys are currently playing with lots of our Minifigures so this doesn’t include our full collection – I didn’t want to interrupt their epic battle scenes.  But I love that we have some room to grow with this and could always make another one if needed. I have a feeling that we may need one just to hold our Star Wars characters soon! 

LEGO Minifigure Display Frame For LEGO Room

Now that we have an official LEGO Minifigure Display frame, I think we will really enjoy collecting these cute little characters. I just love the all of the details that goes into each Minifigure. LEGO really is such a cool hobby!

LEGO Minifigure Display Frame

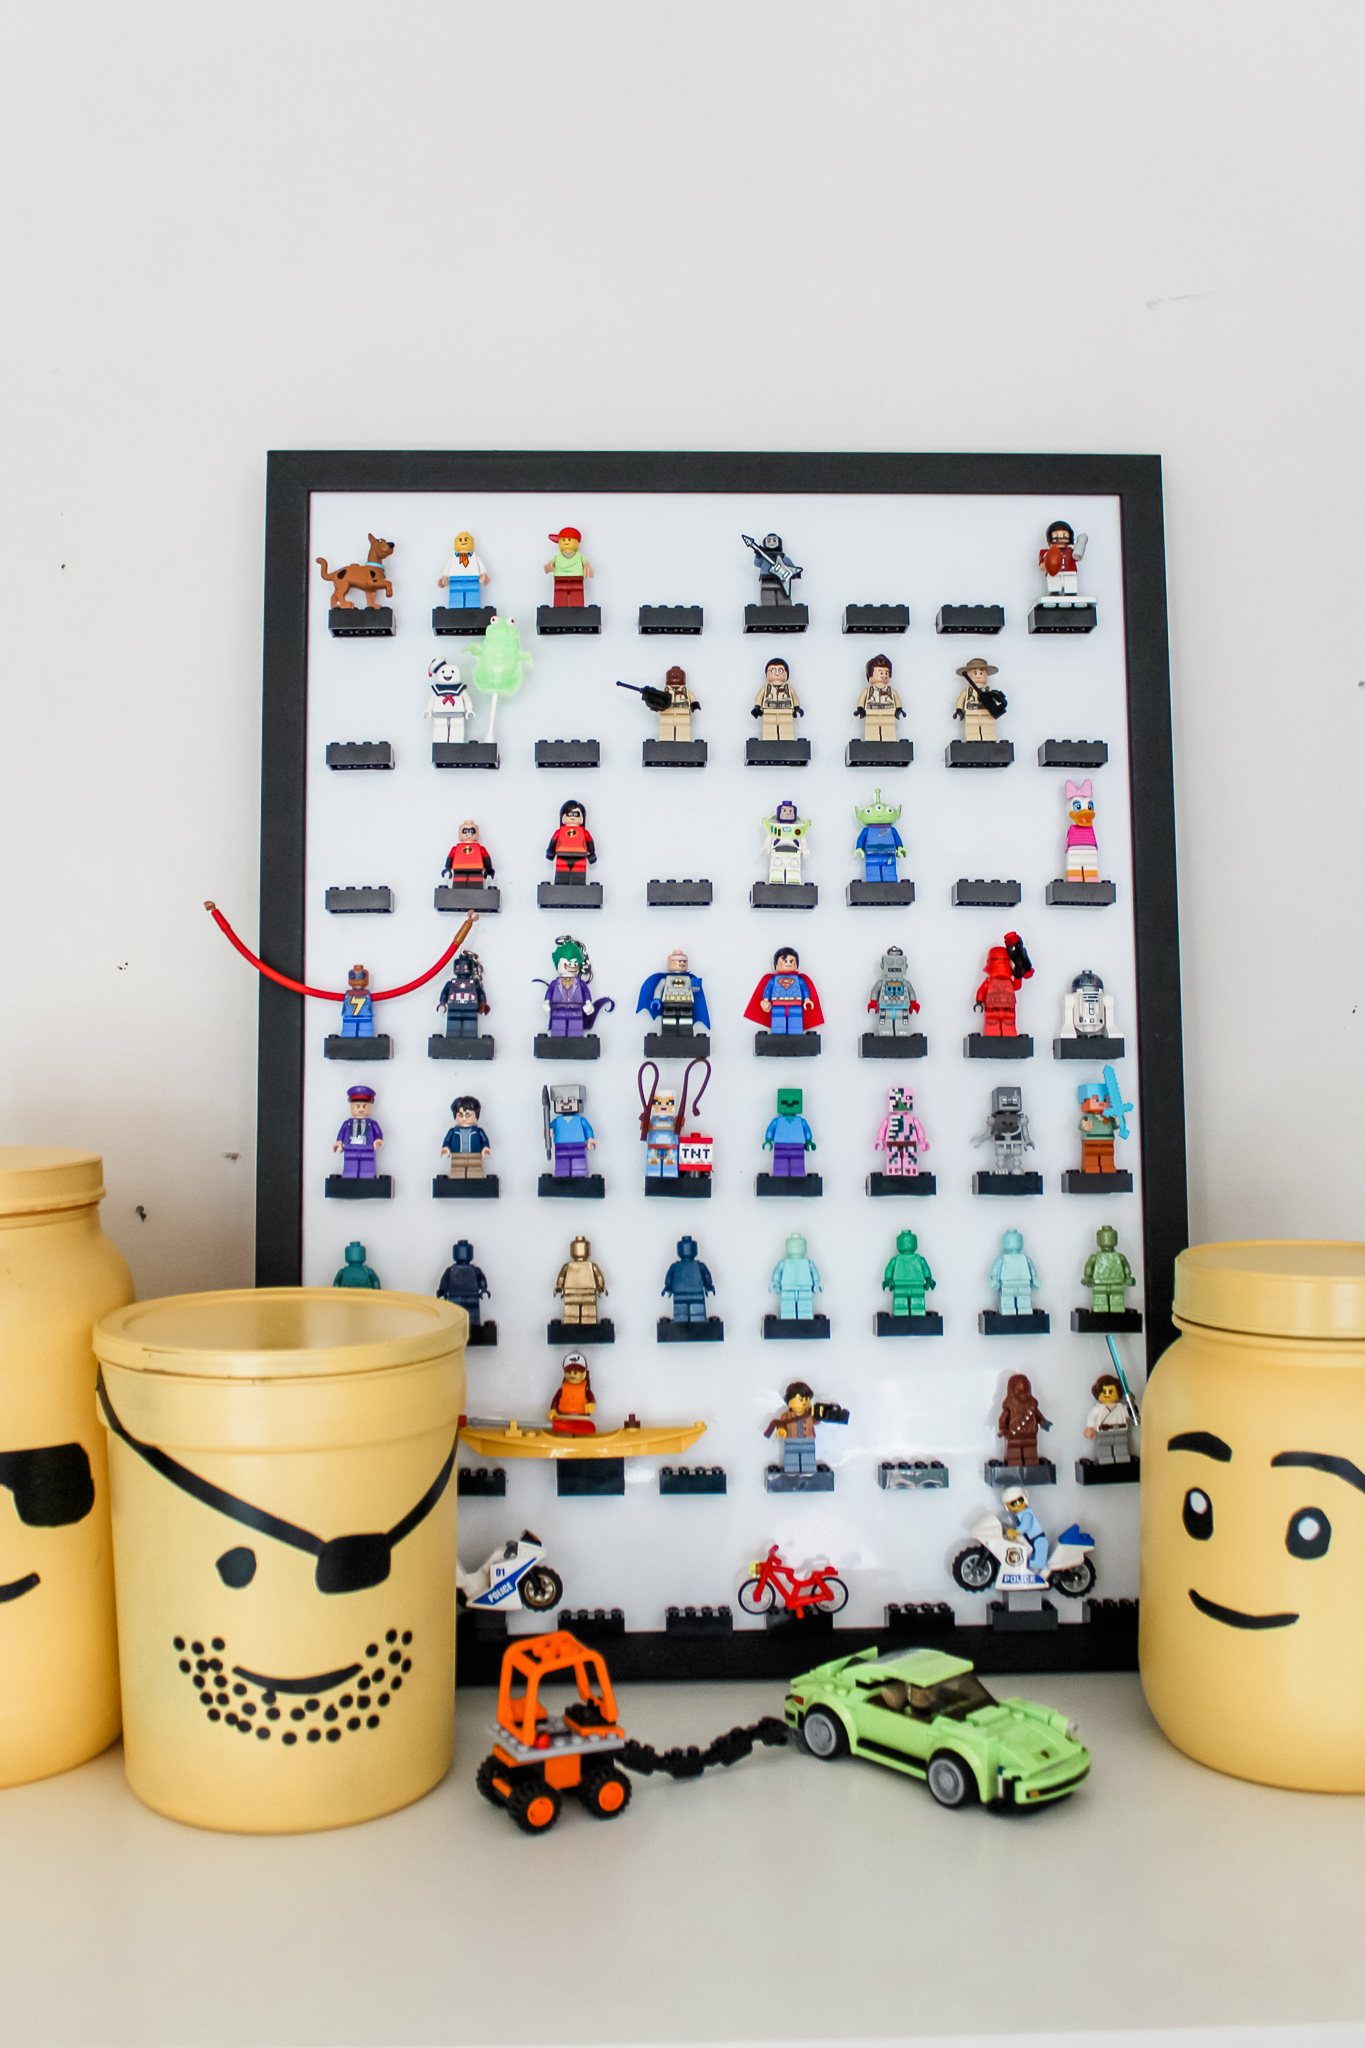
I can’t show these pictures and not mention those big yellow LEGO faces. Yep, those are a few more DIY No-Cost LEGO Head storage containers. I had the boys help pick out a few more faces and we made a couple more. I love them all- but I think the pirate face is the winner!  You can see how we made these FOR FREE here. 

Alright- one final week to pull this space all together… let’s take a look at how I am doing on my $100 Budget: 

$50 Pair of File Cabinets
$6 Wood for Lego Workshop Table 
$15 Gray Area Rug
$0 Pair of Chairs (These were in the dining room and looking for a new home)
$4 LEGO Minifigure Display Frame 
$2 Small Black & Gold Table Lamp
$0 Ikea Bookshelf (pulled in from the playroom)
$0 Blue Desk Organizer
$0 No Cost LEGO Head Storage – See how I made this for free here
$17 64 Black LEGO bricks

Welp- I am up to $99 spent leaving me with $1 left to spend.  Guess I need to call it a wrap and finish pulling this nook together.  Be sure to check back next week for the full reveal- and check out all of the other $100 Room Challenge participants below!

CLICK BELOW FOR ALL THE LEGO BUILDING NOOK DETAILS! 

LEGO Building Nook Inspiration Board 

LEGO Storage  || No Cost LEGO Head Storage Craft

Free LEGO Patent Art

LEGO Workshop Desk

LEGO Minifigure Display

LEGO Building Nook Reveal


You are invited to the Inlinkz link party!

Click here to enter

Related posts:

LEGO Building Nook || Free LEGO Patent Art Lego Building Nook || The Final Reveal $100 Room Challenge || Kids Lego Nook $100 Room Challenge || Lego Workshop Desk

11 Comments

« 20 Minute Organizing || Athleisure Refresh
Our Atlanta Sports Themed Playroom Makeover Has Begun! »

Comments

  1. Terrie - Decorate and More with Tip says

    Sep. 23, 2020 at 10:13 am

    Heather you have really knocked the boy’s lego work area out of the ball park. They are going to never want to leave the space. Love the lego board so cute!

    Reply
  2. Jen @ JENRON DESIGNS says

    Sep. 23, 2020 at 2:28 pm

    Oh my, the hubby is completely geeking out over this room LOL! This is soooo Awesome love this project so much!

    Reply
    • Heather says

      Sep. 24, 2020 at 11:38 am

      Ha Ha! I am totally geeking out over this room too! It’s the little things!

      Reply
  3. Linda🐝 says

    Sep. 23, 2020 at 9:34 pm

    I want to make a minifigure board like yours. The Amazon link for the 2 X 4 blocks indicated the blocks are larger than will fit on a 17 X 23″ board like you have. Could you measure your individual black blocks and let your readers know the exact size? Thanks!

    Reply
    • Heather says

      Oct. 2, 2020 at 9:59 am

      Hi Linda! Yes the 2×4 blocks are approx 1.25 inches long X .5 inches wide and .25 deep. I don’t know why those dimensions on Amazon are so crazy! If you look down below it says it is LEGO part 3001 and Dimensions: 0.6 inches wide by 1.2 inches long which is in line with the 2×4 brick! Hope it works out for you!!

      Reply
  4. Marley says

    Sep. 24, 2020 at 7:07 pm

    Wow. The LEGO room is looking great! I think the boys will spend a lot of time playing in there! Great job!

    Reply
  5. Jackie @jackiecantblog says

    Sep. 28, 2020 at 6:35 am

    I seen a few different ways to make these display boards- but yours is so accessible! I think that anyone could do this simple upcycle. And love the new Pirate Guy- too cool

    Reply
  6. Erin- Lemons, Lavender, & Laundry says

    Sep. 28, 2020 at 3:46 pm

    What a cute idea! My boys LOVED playing with Legos (and they still do sometimes). I love when decor and function work together. I’m so excited to see this space on Wednesday for the reveal!

    Reply
  7. Brooke says

    Sep. 28, 2020 at 7:12 pm

    I love this idea! What a clever way to display all those figurines!

    Reply
  8. Kandi says

    Nov. 13, 2022 at 9:46 am

    Love this idea! I have a question- do you find this is easy for the Lego guys to come on and off the bricks to play with? Or are you using this strictly as display only?

    Reply
    • Heather says

      Nov. 17, 2022 at 9:52 pm

      Thanks! We do actually pretty much only use it for display… I wouldn’t say it is strong enough for everyday wear and tear.

      Reply

Leave a Reply Cancel reply

Your email address will not be published. Required fields are marked *

  • Facebook
  • Instagram
  • Pinterest

Recent Posts

  • Front Porch Coffee Talk Mar. 27, 2025
  • What I’m Reading || THE GOD OF THE WOODS Mar. 4, 2025
  • Porch Season Feb. 28, 2025
  • Front Porch Coffee Talk Feb. 14, 2025
  • Let’s Go Shopping || My Weekly Faves and Finds Feb. 11, 2025
  • Let’s Host a Galentine Mahjong Lunch Feb. 10, 2025
  • Lake House Tour || The Coffee Nook Feb. 5, 2025
  • Valentine Moss Topiary Jan. 30, 2025
  • What I’m Reading || The Frozen River Jan. 26, 2025
  • Lake House Home Tour || Living Room and Dining Jan. 22, 2025
  • Thrift Flip || Painted Pleated Lampshades Jan. 20, 2025
  • Lake House Home Tour || The Front Porch and Foyer Jan. 16, 2025
  • Let’s Go Shopping || My Weekly Faves & Finds Jan. 14, 2025
  • HOSTING || Après Ski Charcuterie Jan. 12, 2025
  • Preppy Lake Lodge Finds Jan. 10, 2025

Subscribe to our mailing list

* indicates required
Front Porch Coffee Talk
What I'm Reading || THE GOD OF THE WOODS
Porch Season
Front Porch Coffee Talk
  • March 2025 (2)
  • February 2025 (5)
  • January 2025 (9)
  • August 2024 (5)
  • June 2024 (3)
  • May 2024 (1)
  • April 2024 (1)
  • March 2024 (2)
  • February 2024 (4)
  • January 2024 (3)
  • December 2023 (3)
  • November 2023 (7)
  • October 2023 (5)
  • September 2023 (7)
  • August 2023 (15)
  • July 2023 (3)
  • June 2023 (8)
  • May 2023 (6)
  • April 2023 (9)
  • March 2023 (7)
  • February 2023 (12)
  • January 2023 (12)
  • December 2022 (2)
  • November 2022 (10)
  • October 2022 (15)
  • September 2022 (2)
  • August 2022 (4)
  • July 2022 (8)
  • June 2022 (17)
  • May 2022 (20)
  • April 2022 (17)
  • March 2022 (8)
  • February 2022 (12)
  • January 2022 (18)
  • December 2021 (16)
  • November 2021 (9)
  • October 2021 (8)
  • September 2021 (7)
  • August 2021 (4)
  • July 2021 (6)
  • June 2021 (10)
  • May 2021 (9)
  • April 2021 (17)
  • March 2021 (13)
  • February 2021 (16)
  • January 2021 (18)
  • December 2020 (8)
  • November 2020 (11)
  • October 2020 (14)
  • September 2020 (17)
  • August 2020 (16)
  • July 2020 (14)
  • June 2020 (9)
  • May 2020 (18)
  • April 2020 (10)
  • March 2020 (9)
  • February 2020 (14)
  • January 2020 (9)
  • December 2019 (8)
  • November 2019 (17)
  • October 2019 (14)
  • September 2019 (9)
  • August 2019 (6)
  • July 2019 (9)
  • June 2019 (10)
  • May 2019 (9)
  • April 2019 (9)
  • March 2019 (10)
  • February 2019 (12)
  • January 2019 (10)
  • December 2018 (4)
  • November 2018 (10)
  • October 2018 (7)
  • September 2018 (8)
  • August 2018 (5)
  • July 2018 (7)
  • June 2018 (12)
  • May 2018 (11)
  • April 2018 (8)
  • March 2018 (12)
  • February 2018 (3)
  • January 2018 (3)
  • December 2017 (8)
  • November 2017 (13)
  • October 2017 (12)
  • September 2017 (9)
  • August 2017 (11)
  • July 2017 (8)
  • June 2017 (3)
  • May 2017 (8)
  • April 2017 (2)
  • March 2017 (10)
  • February 2017 (7)
  • January 2017 (8)
  • December 2016 (10)
  • November 2016 (8)
  • October 2016 (14)
  • September 2016 (10)
  • August 2016 (6)
  • July 2016 (6)
  • June 2016 (9)
  • May 2016 (9)
  • April 2016 (11)
  • March 2016 (6)
  • February 2016 (7)
  • January 2016 (7)
  • December 2015 (10)
  • November 2015 (6)
  • October 2015 (8)
  • September 2015 (9)
  • August 2015 (2)
  • July 2015 (6)
  • June 2015 (8)
  • May 2015 (5)
  • April 2015 (9)
  • March 2015 (11)
  • February 2015 (11)
  • January 2015 (7)
  • December 2014 (13)
  • November 2014 (14)
  • October 2014 (6)
  • September 2014 (9)
  • August 2014 (9)
  • July 2014 (4)
  • June 2014 (5)
  • May 2014 (6)
  • April 2014 (6)
  • March 2014 (4)
  • February 2014 (5)
  • January 2014 (3)
  • December 2013 (4)
  • November 2013 (3)
  • October 2013 (5)
  • September 2013 (8)
  • August 2013 (3)
  • July 2013 (3)
  • June 2013 (7)
  • May 2013 (7)
  • April 2013 (7)
  • March 2013 (5)
  • February 2013 (4)
  • July 2012 (1)

Copyright © 2025 · glam theme by Restored 316

Copyright © 2025 · Glam Theme on Genesis Framework · WordPress · Log in