• ENJOY >
    • Holidays & Parties
    • In a HEALTHY State of Mind
    • In a SPRING State of Mind
    • In a SUMMER State of Mind
    • In a Fall State of Mind
    • In a Christmas State of Mind
  • STYLE>
    • Style
  • CREATE >
    • Feeling Crafty
    • Simple Gift Ideas
    • Dollar Store Crafts
    • Free Printables
  • DECORATE >
    • Home Decor
    • Porch Life
    • Home Tour
  • EXPERIENCE>
    • Holidays & Parties
    • TRAVEL
    • I ❤️ ATLANTA
    • Girls Weekend
    • Front Porch Coffee Talk
    • Taco Tuesday
    • About >
      • Meet Heather
      • Press
      • Contact
      • Privacy Policy & Disclaimers
  • SUBSCRIBE
  • SHOP>
    • Shop Instagram
    • Daily Finds

Southern State of Mind Blog by Heather

{Spring} Gussied Up Easter Eggs

in create, holidays, Inspiration, Spring on 03/11/15

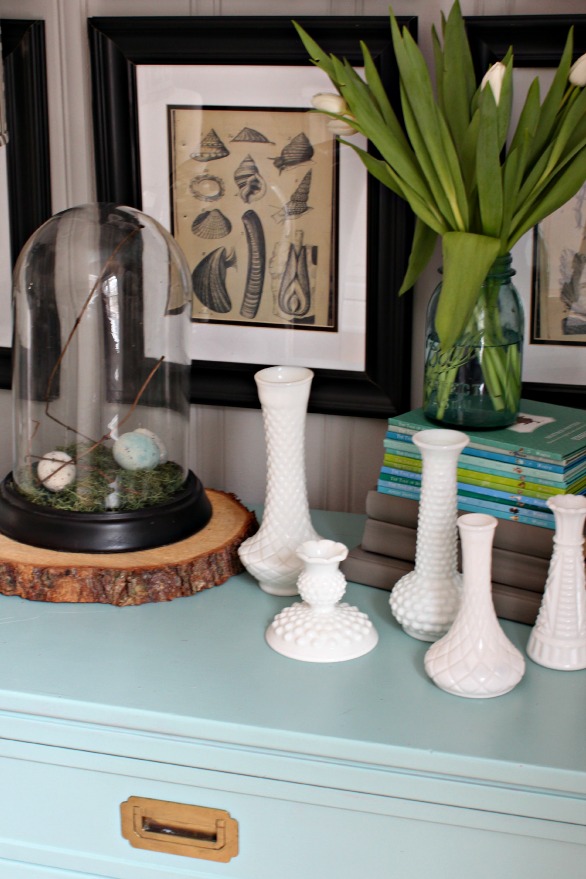
Hi friends and happy spring! I am thrilled you are here for this simple Painted Easter Egg tutorial. If you have spring on your mind, be sure to check out all of my simple Easter crafts here. But first, today I am going to show you how I turned some cheap-o plastic Easter eggs into more natural pretty ones. Painted Easter eggs are super easy and a fun way to decorate for Easter! These chalk paint Easter eggs can come together with leftover paint supplies. (Especially if you hoard craft supplies! #guilty)

Painted Easter Eggs
Who doesn’t have a bag full of the fake colorful plastic eggs? Go ahead and grab a few for this painted Easter eggs project. Then you just need a couple more supplies.
 

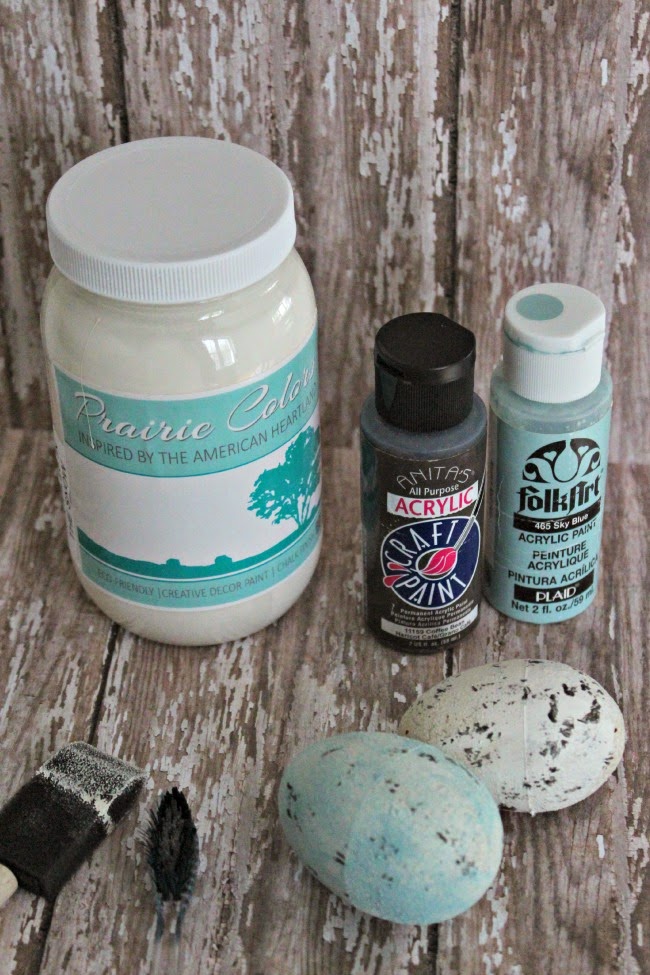
Painted Easter Eggs Supplies: 

  • Plastic Easter Eggs
  • Cream Chalk Paint (similar)
  • Brown Craft Paint
  • Robin’s Egg Blue Craft Paint
  •  Foam Brush
  • Toothbrush
Chalk Paint Easter Eggs

Painted Easter Eggs Directions:

 
STEP 1: Painted Easter Eggs
Use the big foam brush to give the plastic eggs a coat of chalk paint. Chalk paint is great because it sticks to anything! I used a creamy white color as the base.
 
STEP 2: Painted Easter Eggs
Use your foam brush to add a little Robin’s Egg blue coloring with the blue paint. I was sure to wipe some off as I went to ensure I didn’t give it full coverage. Imperfection is good here and really adds to the natural look of speckled eggs. 
 
STEP 3:  Painted Easter Eggs
Now it’s time to speckle the eggs! To do this, dip your toothbrush into the brown paint and then brush it with a paper towel so there isn’t much paint on the toothbrush.  Or what this freckle girl I like to think of as their freckles. 🙂
Once you have a little brown paint ready, just lightly tap the eggs to add this final layer. Again, imperfection is great here! 
 
 
Chalk Painted Easter Eggs
 
It’s always fun to use items I have on hand  and I am thrilled with the way these painted Easter eggs turned out for some spring decor! And who doesn’t love a simple craft that just about anyone can do? I think these would be really cute on a spring wreath too!
 
Spring-Vignette
 

WANT to access my free printable library? Just subscribe to the SOUTHERN STATE OF MIND RESOURCE LIBRARY . You will receive a welcome email with the password to access the library.  

ACCESS THE FREE RESOURCE LIBRARY

*By submitting your email,  you will be added to the 
Southern State of Mind email subscriber list. 

 
For more Easter and Spring inspiration click here!


Happy (almost) SPRING!!!

xoxo,
Heather

Related posts:

How to Make Easy Chinoiserie Blue and White Easter Eggs DIY Marbled Indigo Egg Topiary Adorable Blue and White Bunny Artwork Free Printables A Simple Kitchen Island Centerpiece that Screams Spring

9 Comments

« Knock Off Ceramic Giant Clam Shell
Udder Madness Chair Makeover »

Comments

  1. AvatarChristy @ 11 Magnolia Lane says

    Mar. 13, 2015 at 3:46 pm

    Such a creative idea–those look super! Pinned!

    Reply
    • AvatarLisa says

      Feb. 27, 2018 at 11:23 am

      What a cute idea to “Welcome Spring” to any room in your house! Gotta try it!

      Reply
  2. AvatarPaudor says

    Feb. 23, 2016 at 3:07 pm

    What a cute idea! I can’t wait to try these and use for Easter decorating. Thank-you for sharing!

    Reply
  3. AvatarKimm at Reinvented says

    Jan. 21, 2017 at 6:21 pm

    Really great idea, and awesome results! I love the speckled look. Will definitely dig out some plastic Easter eggs and give this a try!

    Reply
  4. AvatarLesa says

    Mar. 25, 2017 at 4:33 pm

    Those eggs are far more attractive than the shiny plastic ones. What a great Idea! I can’t wait to spruce up some Eggs!

    Reply
  5. AvatarLisa says

    Feb. 27, 2018 at 11:24 am

    What a cute idea to “Welcome Spring” to any room in your house! Gotta try it!

    Reply
  6. AvatarSue says

    Mar. 17, 2018 at 7:32 pm

    Can’t wait to try this…great idea. thanks for sharing

    Reply

Trackbacks

  1. Dollar Store DIY Easter Decoration - Prudent Penny Pincher says:
    Mar. 16, 2018 at 3:05 pm

    […] eggs (Try this tutorial for realistic dollar store Easter […]

    Reply
  2. Step-by-Step Blue Indigo Marbled Easter Egg Topiary Tutorial says:
    Feb. 15, 2019 at 11:37 am

    […] {Spring} Gussied Up Easter Eggs […]

    Reply

Leave a Reply Cancel reply

Your email address will not be published. Required fields are marked *

  • Facebook
  • Instagram
  • Pinterest

Recent Posts

  • What I’m Reading || American Dirt Mar. 1, 2021
  • Front Porch Coffee Talk Feb. 25, 2021
  • I ❤️ ATLANTA || Hikes Around Town Feb. 24, 2021
  • Daily Looks || Boot Crop Jeans Feb. 22, 2021
  • Front Porch Coffee Talk Feb. 19, 2021
  • Living that 30-A Life || February Weekend Getaway Feb. 18, 2021
  • Daily Looks || Winter Weekend Casual Feb. 16, 2021
  • Front Porch Coffee Talk Feb. 12, 2021
  • Happy Hour || Espresso Martini Feb. 11, 2021
  • All You Need Is Love (and a pretty coffee table book) Feb. 10, 2021
  • How to Make the Perfect Avocado Toast (all from Trader Joe’s) Feb. 9, 2021
  • DAILY LOOKS || Cute Target Dresses for Early Spring (under $30!) Feb. 7, 2021
  • Front Porch Coffee Talk Feb. 4, 2021
  • Let’s Go Shopping || My Weekly Faves & Finds Feb. 4, 2021
  • What I’m Reading || The Seven Husbands of Evelyn Hugo Feb. 3, 2021

Subscribe to our mailing list

* indicates required
{Spring} Gussied Up Easter Eggs
DIY Floating Outdoor Curtains
Easy Banana Pudding That Is Guaranteed to Be Devoured
{DIY} Dollar Tree Three Tier Tray Tutorial

Copyright © 2021 · glam theme by Restored 316

Copyright © 2021 · Glam Theme on Genesis Framework · WordPress · Log in