Hey friends! I’m back this week with my final update before the BIG REVEAL next week. I can’t believe it has already been three weeks since I started this project! With a trip to NYC, North Carolina and two family destination weddings coming up, I am SO thrilled to have my closet wrapping up so I can focus on getting ready for the fun trips. Not only does my closet make me smile every time I walk in it now, I feel so organized and ready to tackle packing. I was even able to grab a few things I knew I needed after “The Great Purge of 2018” to pull a few new outfits together. If I haven’t already emphasized this enough before I will go ahead and say it again – tackling this project after dealing with the mess for so long has been a complete sanity saver.
Before I share the final closet reveal, let’s talk closet organization. Specifically for jewelry, purses and shoes. This has been a really fun part of putting this space together and I hope you are able to grab some inspiration for your own closet.
So let’s get started shall we?
This wall is really the one that works hard for organizing accessories. As you can see, pretty much every inch is getting put to use. Although there is a lot going on, you can also see that everything has a place now. This has already changed the way I buy things. If it has to live in this closet, I want to think long and hard about it taking up real estate in here.

The central cubby that used to store shorts is now the workhorse for jewelry. As I mentioned in my last post, I went through 20 years of jewelry that I had acquired and got rid of anything that was not repairable or that I just no longer liked. Anything I wanted to hold onto but that I don’t wear very often was put in individual zip-lock baggies and then all of those were put in a large shoe box to store. The things that made the cut are now on display so I can easily select them when getting dressed.
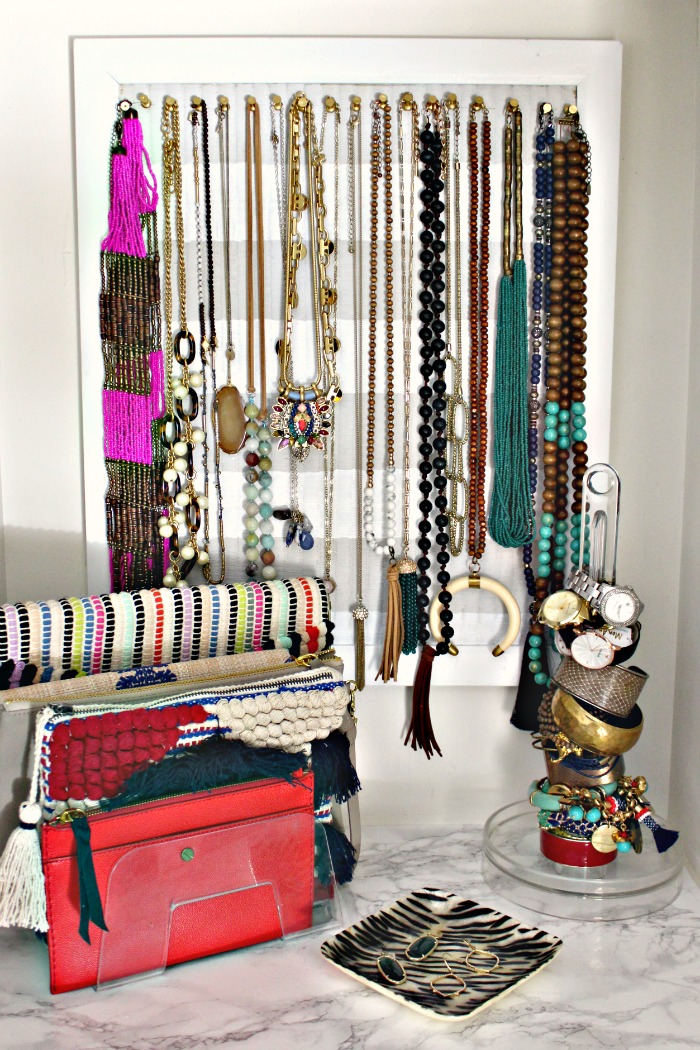
The necklace holder was a quick DIY. I found a bulletin board and added some gray and white stripes with the same paint I used to stencil the wall. Then I just spray painted some push pins I had with gold spray paint. So simple (and inexpensive!) but I absolutely love this for holding my necklaces. The zebra dish I already had and I found an acrylic paper towel holder and that now serves as a bracelet and watch holder.

The clutch holder is an acrylic file folder that I thrifted and holds all of my most used and favorite clutches. I also added some marble contact paper to the shelf for a little extra sass.

On the next shelf up, I had some leftover PVC piping from a garment rack I DIY’d (more on that later) and made a bracelet holder. I have already started wearing bracelets 10 times more often because of this simple rack than I ever did before when they were shoved in drawers all over the place. The earring holder is something I already had but I spray painted white with rose gold legs to match the closet decor. The leopard clutch holder is a napkin holder I found at the thrift store and painted rose gold.

Here you can see how I am storing my beach and Kentucky Derby hats. These displays are simply candle pillars that I grabbed from my storage shelves. The leaning mirror is the mirror I was previously using in my closet and fit perfect up on the top shelf. Doesn’t this feel like a little boutique?

Below the hats are my purses and bags. I found two acrylic shelf dividers and screwed them into the shelves to help keep the bags upright.

One of my favorite things in the closet is this shadowbox frame. I’ve had this forever and it has floated around from room to room over the years. Now it holds a few fun statement necklaces and some sentimental jewelry. This includes a few pieces from high school from my parents and all of the sweet pieces that Brian gave me back when we were dating.

Below the shadowbox is the rest of the clutches. This plastic shelving was an existing thing from my closet that used to sit on the ground holding clutches. Imagine my delight when I turned it sideways and it fit perfectly in the shelf to hold my clutches.

And now let’s move on to the shoes. On the center shelving, I am displaying my favorite few pairs of shoes…. well mostly because they are pretty. 🙂


I put my favorite few pairs of tall boots to the left side and the rest of the shoes I wear often are on the white shelves on the right side. I had these in my closet before but they were always a hot mess because I had way too many pairs on them. Now I’ve only picked out the shoes I wear the most to put on here and either got rid of the rest or put in overflow storage that I’ll show you below. Also, those two dresser drawers were a side of the road grab and I painted them and added some marble contact paper and now they hold flip flops and winter socks.

In this side nook, I have my hats. Not shown here but I also store my large clothes steamer right here so I can easily pull it out and steam my clothes if needed before I wear them. Side note- a steamer is a new addition to my life but now I wonder how I ever got along before it!

Another trick I am using throughout the shelving is pretty cardboard boxes. The blue ikat ones I already had and the rest are pretty shoe boxes or plain brown boxes covered with marble contact paper.


Can we just talk about scarves for a minute? When I finally sorted through everything in “The Great Purge”, I could not believe how many scarves I actually had. They were hiding in drawers and baskets and basically out of control. Clearly I love buying scarves. However, I don’t actually wear them very often and really had to be realistic about what I would wear. So I got rid of bunches and am using this shoe holder (that I had) for the ones I kept. And now moving forward when I am tempted to buy a scarf I will need to think long and hard about whether it is going to fit in this holder.

Here you can see some shoe overflow on the other wall. This is on the top shelf and I already had the plastic shelving, it just needed to be reconfigured to fit up here. This is where heels and summer sandals that I don’t wear very often are now stored. And I added this gauzy panel to cover some electronics for our bedroom that can’t be moved and some more boot storage. Since the equipment gets hot the gauzy fabric is perfect for circulation so it won’t overheat and I just used an over the door coat rack that I had to hang the panel.

Wow! Looking at all of this organization makes me giddy and I kind of want to tackle every single cranny in the house just knowing how good this feels.
As with any room I tackle, there are always a few twists and turns at the very end when I pull the room together, and this one was no exception. (hint- remember those gaping holes on the built in desk… yeah… they were still gaping up until yesterday!!) But I worked through the last of the pesky little details and I actually wrapped up the closet yesterday. I cannot wait to share the final reveal. Be sure to check back next Wednesday!
To catch up on previous weeks- here are the posts:
Week 1: Master Closet- The Befores and Vision
Week 2: Fresh Paint and a Side of Leopard
Week 3: Organizing All the Things
Week 4: Final Reveal!
xoxo-
Heather
To see all of the other great $100 challenge rooms click below!


It looks great! I can’t wait for the grand tour next week!
Just looking at this makes my organizing heart so happy! I can’t wait to see the big reveal!
Heather, This is FABULOUS!!!! I almost did my closet for this round, but now I’m glad I waited, because you have some great ideas here. And I love your term “side of the road grab” 🙂 Can’t wait to see it all pulled together next week.
It looks great! I wish I had a big closet like that!